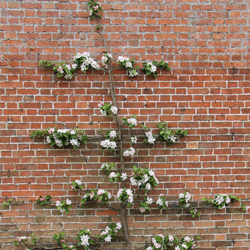
Author Archives: Horning's Greenhouse

Try Something New: Pomegranates

Want to grow an exotic fruit that is delicious, nutritious, beautiful and incredibly hip? You really should consider planting a pomegranate! It’s not as difficult as you may think.

Why Pomegranates are Popular

Pomegranate is a stunning superfood rich in antioxidants, folic acid and vitamins A, C and E. It has no cholesterol, and is also rich in fiber and potassium. Because of these nutritional advantages, pomegranate is showing up in a multitude of supermarket products like yogurts, juices, salad dressings, jellies and desserts. It can be added to sauces, fruit crisps, salsas, relishes, dips and more. You can even make a pomegranate martini! And, of course, it’s an extraordinary experience eating a fresh pomegranate. These are stunning, delicious fruits that are rarely seen in backyard gardens, but can make a great landscaping statement when properly grown.

Growing Pomegranates in the Landscape

Pomegranates grow as multi-stemmed, small trees or large shrubs. They reach 15 feet tall by up to 15 feet wide. In spring, vibrant, gorgeous orange-red flowers grace the branches of this plant. These beautiful blossoms develop into the luscious pomegranate fruit containing dozens of tart and tangy bright red seeds and pulp. The fruit ripens somewhat square in the early fall and has a leathery skin that can be yellow to red in color.

The cultivar ‘Wonderful’ is hardy to zone 7 and is easy to grow. Plant your tree in full sun. It will thrive in the summer heat and in most soils. Pomegranates are drought tolerant, however, the fruit is better and the seeds more plump with regular deep irrigation. Because this fruit tree is self-fertile, there is no need to plant a second one for pollination.

Enjoying Your Pomegranates

If you’ve never cut your own pomegranate, it can be frustrating to learn how to separate the juicy seeds from the husk and membrane. To access the seeds…

  1. Cut off the crown of the fruit.
  2. Score the leathery husk in quarters from stem to crown end.
  3. Set the scored fruit in a bowl of cool water and let soak for a few minutes.
  4. Hold the fruit under water and break scored sections apart with your fingers, separating the seeds from membrane. The seeds will sink to the bottom of the bowl.
  5. Discard the skin and membrane.
  6. Drain the seeds on paper towels.
  7. Toss pomegranate seeds into your salad, mix them in your yogurt or smoothie or shake them into a martini and enjoy!
pomegranate-1pomegranate-2pomegranate-3

Holey Moley, Shrew or Vole!

Mole, vole or shrew: ever wonder what the difference is between these pests, or why you should care? All three of these mouse-like creatures may be seen in or around your garden. Identification is important in determining if and how you should control these critters.

Moles

  • Identification: A mature mole will grow 5-7 inches from snout to tail. Moles have soft, thick, velvety-gray fur, a long, blunt snout and an approximately 1-inch long tail. Their eyes and ears are inconspicuous, hidden under their fur. Their paddle-like front paws are two to three times wider then their rear paws.
  • Damage: Moles, in search of grubs, beetles and earthworms, burrow in the ground and create tunneling in the lawn and garden. They surface occasionally leaving small hills of loose soil. Moles are solitary, subterranean creatures.
  • Control: Reduce food supply by controlling grubs in the lawn. Use repellents containing castor oil, or toxic baits placed in the tunnel but out of reach of pets. There are several different styles of mole traps available on the market.

Voles

  • Identification: Voles, often called meadow mice, are a little larger than moles reaching 5-8 inches long at maturity. Their heads are rounded, their eyes are larger than shrews, their fur is brown, short and smooth, their front paws are about the same width as their rear paws and their tails are about 1 ¾ inches long.
  • Damage: Voles are herbivores that feed on bulbs, tubers and tender young plants. During the winter, often under the cover of snow, voles will eat surface roots and chew bark from the base of trees and shrubs often causing the plant to girdle and die. Voles, unlike moles and shrews, are social and where you find one, you will find many. Voles will often tunnel in mulch or ground cover above ground leaving surface trails. They sometimes run through old mole tunnels eating plant roots.
  • Control: Use Thiram-based repellents. Set up mouse traps baited with peanut butter or apple slices. Keep mulch away from tree trunks. Remove snow from the base of trees and shrubs in the winter. Protect young trees by wrapping the lower trunk in wire mesh. Apply predator urine to the area and reapply frequently. Do not use poisons.

Shrews

  • Identification: A mature shrew will reach 4-5 inches long. Shrews have a thin tail about 7/8 of an inch long, soft, grey, short fur, small beady eyes, small ears and a pointed snout.
  • Damage: Shrews, like moles, are insectivores. They eat earthworms, grubs and other insects. Shrews, however, are often seen above ground although they tend to use old mole and vole tunnels to get around. Shrews cause no real damage to plants and eat a variety of insects making them beneficial in the landscape and garden.
  • Control: None necessary.

Not sure what to do about these pesky garden visitors? Stop by to see our complete line of safe, effective pest control products and to ask for expert consultation about which visitors should be welcome in your garden and which ones you should gently encourage to leave.


Heath or Heather

Often mistaken for one another, heath (Erica) and heather (Calluna) look amazingly similar. To confuse things further, heath is frequently referred to as “spring heather” and some landscapers, garden centers and nurseries may use the names interchangeably. Both types of plants belong to the Ericaceae family, and they share many similarities.

Which is Which?

The key difference between these two popular landscaping plants is that heath blooms from winter to early spring while heather blooms from mid-summer to early fall. Heath features slim, needle-like foliage, while heather’s foliage is flatter and more scale-like. Heath generally only grows to 12 inches tall, while different heather cultivars can range from 8-20 inches tall. With their many similarities for location, soil type and sunlight, however, it is easy to grow these two shrubs together for a much longer and more brilliant flowering season.

Heath and Heather in the Landscape

Both heath and heather are low maintenance, low growing, perennial shrubs that love well-drained, acidic soil, but do not plant them too deeply or their shallow root systems may rot or smother. Heath, or spring heather, has tiny, urn shaped flowers in white, rose or fuchsia and is readily available in early spring. Heather will be more popular later in the season and into early summer, and its bell-like mauve, rose or lavender flowers provide lovely color to the landscape later in the season. Depending on the cultivar, heather’s foliage can range from bright green to golden yellow, reddish or even silvery-gray.

Both plants should be watered well, and mulching around the shrubs will help inhibit weeds and conserve moisture without overwatering. Pruning should be done just after blooming is finished to maintain and shape the plant mounds and discourage overgrowth and legginess.

Heath and heather look terrific planted en masse on a sunny hillside or in the shrub border with other acid-loving plants like azaleas and rhododendrons. They are a welcome addition to the rock garden and can brighten up a dwarf conifer grouping or container garden. Their mounding habit makes the plants easily spill over edges for a naturalized, graceful organic look ideal for cottage gardens and flowing landscape design.

It is important to note, however, that deer can be very attracted to both heath and heather. If these backyard visitors are a problem in your garden or pester your landscape, you may want to take a variety of steps to keep them away from your beautiful shrubs.

Planted together, heath and heather will provide you with a succession of dainty blooms to take you through the entire growing season.

Heatherheath

Growing Under Black Walnut

If you have a black walnut tree on your property, you know how difficult it can be to find anything that will grow anywhere near this plant.

Black walnuts release a substance called juglone into the soil, which is toxic to many ornamental and edible plants and can stunt their growth significantly – in fact, juglone is used as a herbicide in some areas! A mature black walnut tree can have a toxic zone with up to an 80-foot radius, depending on the tree’s size and age. Every part of the walnut tree contains juglone and this substance remains in the soil long after the tree is cut down, continuing to inhibit anything that may be planted in its place.

Fortunately, there is a wide variety of plants that are less affected by juglone and can still thrive in contaminated soil. When choosing to plant in an area where a black walnut is located or where one once stood, it is safe to make your selection from the lists below.

Vegetables

  • Beans
  • Corn
  • Carrots
  • Melons
  • Squash

Fruit

  • Black Raspberry
  • Cherry
  • Nectarine
  • Peach
  • Pear
  • Plum

Annuals

  • Pot-marigold, Calendula officinalis
  • Begonia, fibrous cultivars
  • Morning Glory, Ipomoea
  • Pansy, Viola
  • Zinnia species

Perennials

  • Bugleweed, Ajuga reptans
  • Hollyhock, Alcea rosea
  • European Wild Ginger, Asarum europaeum
  • Astilbe species
  • Bellflower, Campanula latifolia
  • Leopard’s-Bane, Doronicum species
  • Sweet Woodruff, Galium odoratum
  • Cranesbill, Geranium sanguineum
  • Common Daylily, Hemerocallis
  • Coral Bells, Heuchera
  • Plantain-lily, Hosta
  • Siberian Iris, Iris sibirica
  • Balm, Monarda didyma
  • Sundrops, Oenothera fruticosa
  • Summer Phlox, Phlox paniculata
  • Polyanthus Primrose, Primula x polyantha
  • Lungwort, Pulmonaria species
  • Showy Sedum, Sedum spectabile
  • Lamb’s-Ear, Stachys byzantina
  • Spiderwort, Tradescantia virginiana
  • Horned Violet, Viola cornuta

Ferns

  • Crested Wood Fern, Dryopteris cristata
  • Senstitive Fern, Onoclea sensibilis
  • Cinnamon Fern, Osmunda cinnamomea

Bulbs

  • Glory-of-the-Snow, Chionodoxa luciliae
  • Crocus species
  • Winter Aconite, Eranthis hyemalis
  • Snowdrop, Galanthus nivalis
  • Spanish Bluebell, Hyacinthoides hispanica
  • Grape Hyacinth, Muscari botryoides
  • Siberian Squill, Scilla sibirica

Trees

  • Japanese Maples, Acer palmatum
  • Eastern Redbud, Cercis canadensis
  • Canadian Hemlock, Tsuga canadensis

Vines and Shrubs

  • Euonymus species
  • Rose of Sharon, Hibiscus syriacus
  • Honeysuckle, Lonicera species
  • Virginia Creeper, Parthenocissus quinquefolia
  • Arborvitaes, Thuja species

Black walnut can be a challenging plant to have in your landscape, but if you understand the unique characteristics of this tree you can easily pair it with other plants that don’t mind its toxic effects.

Walnut_2Walnut_1

Geranium ‘Biokovo’

“So many Geraniums, so little time.” If this is your motto, we completely understand. There are so many fantastic varieties to choose from, but geranium x cantabrigiense ‘Biokovo’ is extraordinary, and is one bloom you should certainly make time for.

Unlike our tender summer annual commonly called geranium (genus: Pelargonium), true geraniums are hardy, low growing, groundcover perennials commonly known as “cranesbill.” They look nothing like the more familiar, misnamed geraniums and they certainly do not behave similarly. The more you learn about these true geraniums, however, the more you will love them.

About ‘Biokovo’

G. ‘Biokovo’, originally found growing in the mountains of Croatia, is cold hardy and semi-evergreen in hardiness zones 5-8. Growing up to a foot tall and 12-18 inches wide, this cranesbill blooms in late spring, generally stretching from May to June with sporadic reblooming. The five-petaled, three-quarter-inch, white flowers show a tinge of pink in the center, surrounding brighter pink pistils topped with golden yellow stamens. The petals have a slightly frilly texture, giving these blooms a romantic delicacy. The leaves are slightly hairy, lobed, medium green, and develop an orange-red tint in the fall to provide beauty and color in different seasons. The foliage is highly aromatic with a pungent, orange-like scent when bruised.

Planting Geranium ‘Biokovo’

Produced on spreading rhizomes that can vigorously cover an area, G. ‘Biokovo’ is easily grown in well-drained soil with average fertility and neutral (7.0) pH. It is relatively drought-tolerant once established and will thrive planted in either full sun or part shade, but the hottest afternoon sun is best avoided. Deep shade will also stunt the plant’s growth and may limit blooming. Moist soil is suitable, but the soil should not be over saturated and only average watering is required. Fertilize in early spring for the best nutrition and most vigorous blooming. Plant divisions may be done in either spring or fall to expand the ‘Biokovo’ in your landscape or share it with other enthusiastic true geranium lovers.

‘Biokovo’ in the Landscape

Use ‘Biokova’ in the front of the perennial border and in rock gardens to add color, texture and softness. It will steal the show as a long-blooming ground cover or edging plant, and can be ideal to add natural, flowing lines to the edge of flowerbeds, driveways or sidewalks. There are no serious pest or disease problems associated with this or any of the many other hardy geraniums. It attracts butterflies and resists deer and rabbits. Why wait to add this beauty to your flowerbeds?

geraniumbiokovo

Putting on Airs: Tillandsias

Looking for something easy to grow? Tillandsias should be on the top of your list. Tillandsia is the largest genus in the Bromeliad family with over 650 species that vary in color, size, texture and shape. In their native habitat, Tillandsias attach themselves to trees and rocks using their roots. They derive the nutrients and water they need from the air, hence the common name “air plant.” And like their name implies, no soil is necessary for a beautiful, thriving specimen! This versatile houseplant is not fussy, and when given minimal care, will adapt to most home and office environments.

About Tillandsias

Tillandsias are evergreen flowering perennials, and their native range spreads from the southeastern United States to Central and South America. While they are often associated with tropical regions, these diverse plants can also be found in deserts, high mountain ranges and rocky habitats.

It is a common misconception that these are rootless plants – in fact, their roots are critical to serve as anchors and keep the plants stable, though the roots do not absorb moisture or nutrition like other plants. Instead, these plants absorb all they need through their foliage.

Caring for Tillandsias

These delicate plants are easy to care for, but there are some tricks necessary to keep them healthy and looking their very best.

  • Light
    Place your Tillandsias where they will receive plenty of light but not direct sunlight. Direct sun will dry out the leaves very quickly and can cause dehydration and wilting. Home or office fluorescent lighting works just fine.
  • Temperature
    Typical indoor temperatures are perfectly suitable for Tillandsias, and a range of 50-90 degrees Fahrenheit is ideal.
  • Water
    Once a month, soak your air plant in water for about 20 minutes. If the plant is flowering, a delicate rinse would be more appropriate so that the bloom is not damaged. When through soaking, shake off the excess water from the plant and place in an area with good air circulation so it can dry easily. In between soaks, spritz your Tillandsias 1-2 times per week with clean water from a spray bottle. Indoor heat and air conditioning rob moisture from the air. If your air plant leaves start to wrinkle or roll, this is a sign of dehydration. Give them a good soak and spritz more frequently.
  • Pruning
    It is not unusual for the outer leaves of an air plant to dry out and turn brown, and these spent leaves can simply be removed. If leaf tips dry a bit and turn brown, cut off the tip and continue with regular care. The plant will grow and look just fine.

One final note, Tillandsias have beautiful brilliant blooms but only bloom once in their lifetime. Depending on the species, the bloom may last several days to several months. Why not try several different Tillandsia varieties so you can experience these amazing blooms?

tillandsias_2tillandsias_1

Dividing Hybrid Hellebores

Hybrid hellebores bring us all sorts of happiness. These are one of the first plants to bloom in the late winter and early spring and are available in flower colors of chartreuse, cream, white, pink, red and deep purple. Hybrid hellebores are also those rare and treasured perennials that provide year-round interest, giving you the most bang for your buck and brightening your landscape in every season. As evergreens, they never lose their luster, and their flower shapes and textures are quite varied for even more interest, with a cultivar to suit any gardener’s taste. What’s not to be happy about?

A Love Divided

To keep these plants healthy and thriving, and to increase your quantity, division is a necessity. It is important to divide these plants carefully, however, or else you risk sadness with fewer blooms, lopsided plants or even losing these gems. Fortunately, it’s possible for even a novice hellebore lover to divide their plants with confidence.

  1. Divide hybrid hellebores in the spring when it is in bloom. This will also let you see how the blooms are positioned on the plant so you can divide shapes appropriately.
  2. Choose a plant that has at least 5 flower stems. Each one represents a division and will give you great new plants to bloom.
  3. Dig your hellebores up with a garden spade by inserting it deeply into the soil around the perimeter of the plant about 6 inches away from the outer stems of the clump. This will keep the root system largely intact and uninjured.
  4. Lift the clump and shake off loose soil or any trapped rocks or ensnared mulch. You can gently loosen clumps with your fingers, but take care not to damage the roots.
  5. With a garden hose, wash away any additional soil from the clump so the plant roots are exposed. This will help them get established in their new location more quickly.
  6. Divide the clump by cutting through the roots with a heavy-duty serrated knife. Make your root cuts where you see obvious natural divisions between the flower stalks.
  7. Replant your divisions at their original depth, in a shady location. Include plenty of compost in the planting hole for good nourishment. Water well and continue to keep soil from drying out until your new plants are well established.

Before you know it, you’ll have many more hybrid hellebores to enjoy! If you have a few too many, be sure to share the happiness by giving them to family members, friends, neighbors and anyone else who can fall in love with these beauties.

Helleborus orientalis

Trackable Tools

It’s the beginning of a new gardening season. Hopefully you took out last year’s journal in January or February and reviewed your notes on what you wanted to change, improve, experiment with or eliminate from your garden and landscape. Now is the time to begin implementing some of those great ideas, and it starts with having the right tools.

Where Do Your Tools Go?

One common problem in the garden is misplaced tools. We’ve all found hand tools in the spring that were inadvertently thrown in the compost pile or left under a shrub during fall cleanup. Many of us have spent time we didn’t have to spare walking in circles, looking for the shovel that we just had in our hand. It was laid down for a moment and seemed to disappear. Tools can easily disappear on a crowded workbench or in a cluttered shed, or they may even end up in a brush pile or other unlikely location.

When tools are lost, not only are our gardening chores impacted, but the tools can be damaged by exposure or accidental damage if they’re dropped, run over with a mower or otherwise subjected to inadvertent abuse. This can mean we no longer have the tool we need when we need it most, and we have to make a trip to the garden center to replace a tool – using time and money our gardening budget may not have.

Finding Your Tools

Let’s do things differently this year. Let’s save time, money and our precious tools. Resolve to only buy new hand tools with bright colored handles that are easily seen from afar and stand out to be picked up after a long day in the garden. If you already have a good selection of tools that you love and wish to keep track of, simply cover the handle with a bright colored spray paint on a sunny spring day, or wrap the handles with brightly colored tape or other coverings to make them more visible.

Similarly, take the time to clean out and declutter your garden shed, tool boxes and workbenches, making sure there is a safe, appropriate place to store every tool. If each tool has a place, you’ll be able to see at a glance when a tool may be missing and you can find it quickly before you’ve forgotten where you saw or used it last.

You and your garden will be glad you did!

trackable_tools_1

Peach Leaf Curl

If you grow peaches, you have most likely experienced peach leaf curl. Recognizing the symptoms of this infection and understanding what to do about it can help you keep your peach crop peachy keen.

About Peach Leaf Curl

Peach leaf curl (Taphrina deformas) is a fungal disease that infects the immature leaves of peach and nectarine trees and it is often far worse in years with a cool and rainy spring, conditions that allow this fungus to spread more rapidly. The yearly disease cycle begins at bud swell and continues until the young leaves emerge. The infected leaves turn reddish-brown, pucker, shrivel and fall off the tree. With fewer leaves, the fruit crop is not nourished as well and fruit will be smaller and less productive. On rare occasions, the fruit itself may become infected and will show a scabbed, corky surface in patches.

After the initial infection, the velvety spores are carried by the wind and rain, overwintering in the tree bark to infect the tree again the following spring. Repeated infections will lead to branch die back and eventually shorten the life of the entire tree.

Stopping Peach Leaf Curl

If you are considering growing peaches, choose a leaf curl resistant variety of tree. There are both new resistant varieties as well as resistant heirlooms. If you are already growing peaches, keep your tree healthy with proper and regular pruning that will allow adequate air circulation and sunlight between branches to minimize the damp, cool conditions that help this fungus. Proper feeding and watering of your tree will also help it be more disease-resistant.

If the disease presents itself, apply fungicide every year in the fall after the leaves have dropped. In areas with wet winters, it can be helpful to reapply fungicide in early spring before bud swell. Always rake up and destroy the infected fallen leaves. Safer recommended controls include sulfur and copper-based fungicides. Traditional control products include Daconil and Ferbam, and should be used according to the application instructions. If the infection is localized to just a few branches, it may also be possible to prune away those infected branches in late fall to help minimize the spread of the spores.

Peach leaf curl can be devastating to your peach trees, but if you recognize the disease quickly and take proper steps to minimize its effects, you can keep your trees healthy and protect your crop of sweet, delicious peaches.

peach_leaf

Dealing With Winter Damage

It’s early spring – time to survey the damage that winter has produced. In some areas, shrubs may still be hiding under piles of frozen snow, and could be crushed or compacted. Severed tree limbs may lie scattered across the landscape, and bark may be torn and stripped from trunks. It’s difficult to know what to tackle first, but fortunately, much of the damage is easily correctible.

Repairing Winter-Damaged Trees

When surveying and repairing winter damage, start with your trees – they are generally the most valuable additions to your property. As you survey the damage – broken limbs, torn bark, a tilting trunk – ask yourself “Is this tree salvageable or should it be removed?” If the damage is extensive, or you are unsure about how the damage may affect the tree’s overall health or future growth, hire a professional for a consultation. Replacing a severely damaged tree with a younger one, perhaps a type you like even better, may be the best solution.

If a limb is broken somewhere along its length, or damaged beyond repair, employ good pruning practices and saw off the remaining piece at the branch collar, being careful not to cut into the trunk or leave a stub. Sometimes a fallen limb may strip bark off the tree trunk. To repair this damage, cut the ragged edges of the loose bark away from the stripped area to firmly affixed healthy bark. Nature will take care of the rest. Even if the trunk of the tree is split, the tree may still be saved. For large trees, repairing this type of damage usually requires cabling and bracing done by a professional. If the tree is still young, the crotch may be pulled tightly together and tied or taped until the wound eventually heals.

Repairing Winter-Damaged Shrubs

Shrubs can suffer the same damage as trees, including broken limbs and stripped bark. Heavy snowfall can crush smaller shrubs, and larger varieties may have their trunks or centers split from heavy snow or ice accumulation. Most shrubs are resilient, however, and slowly regain their shape as the weather warms. If branches are bent but not broken, you may tie them together to help them along and prevent further damage from late-season storms. Do not tie tightly and remove twine after about a year. Completely broken branches may be pruned away, but take care to maintain the shrub’s form and balance, keeping in mind its growth pattern so it will not look lopsided or ungainly. Again, if the damage is severe, you may need to replace the plant.

The harder the winter is, the more of a beating trees and shrubs will take. With prompt attention in early spring, however, you can easily undo much of the damage and help your landscape recover with ease.

damage_1damage_2