


In the summer months, insects can take their toll on your plants if you are not on the alert for problems. If the right product is used at the right time and under the right conditions, however, pesticides can be reduced to a minimum and your plants will be well-protected.
Organic Products
Apply organic products early in the morning when bugs are eating. To stop insect damage, the spray must be applied to the insect itself or sometimes to where the bug is eating. The entire plant must often be sprayed to keep the pests from moving on to untreated areas. Organic controls include insecticidal soap, Bonide All Season Spray (horticultural oil), Captain Jack’s Dead Bug Brew, tobacco dust, bacillus thuringiensis (Bt), rotenone and pyrethrin sprays.
Contact Products
Inorganic in composition, these insecticides must be applied either to the insect or the leaf where the pest is feeding. Apply in the morning for best results, and as with the organic controls, soak the entire plant so the insects do not find a safer spot to nibble. Contact pesticides include Malathion and Sevin.
Systemic Products
Systemic insecticides circulate to all parts of the plant. Therefore, if you are only able to spray part of a shrub, the product will move to all leaves within 24 hours to control feeding insects for about two weeks. Systemics are best applied in the evenings when there is no chance of rain and sprinklers will not be used. The product will be absorbed only as long as the leaf stays wet. When the leaf dries by mid-morning, the product is then moved through the entire plant when the insects resume feeding. Systemic insecticides available to the homeowner include Bonide Systemic Insect Spray, Ortho Systemic Insecticide and Bayer Season-Long Tree & Shrub.
Not sure how to deal with your pests and unwanted insects? This handy chart can help!
Environmentally Friendly Controls for Common Garden Pests
|
Pest Type |
Control Methods |
| Ants & Cockroaches | Concern Home Pest Control, Diatomaceous Earth, Bonide Eight, Bioganic Spray & Dust, Garlic Barrier |
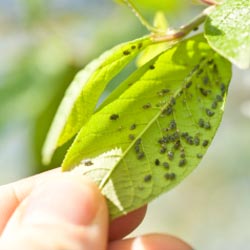
| Aphids | Insecticidal Soap, Pyrethrin, Bonide All-Season Spray, Bonide Eight, Rotenone, Hot Pepper Wax, Neem Oil, Garlic Barrier Predator: Ladybugs, Praying Mantis |
| Caterpillars (Tomato Hornworm, Cabbage Looper, etc.) | Captain Jack’s Dead Bug Brew, Bt (Bacillus Thuringinensis), Dipel Dust, Bonide Eight, Neem Oil Predator: Trichogramma, Praying Mantids |
| Fleas | Diatomaceous Earth, Concern Home Pest Control, Bonide Eight Predator: Beneficial Nematodes |
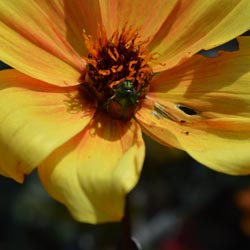
| Japanese Beetles | Beetle Traps, Neem Oil, Schultz Expert Gardener, Pyrethrin, Bonide Eight Predator: Praying Mantids, Beneficial Nematodes for grub stage control |
| Lacebugs | Hot Pepper Wax, Insecticidal Soap |
| Mealy Bugs | Insecticidal Soap, Pyrethrin, Bonide All-Season Spray, Pyrethrin, Bonide Eight Predators: Crytpolnemus or green lacewing |
| Mites | Captain Jack’s Dead Bug Brew, Insecticidal Soap, Bonide All-Season Spray, Pyrethrin, Hot Pepper Wax, Garlic Barrier, Neem Oil |
| Mosquitoes | Pyrethrin, Mosquito Bits, Mosquito Dunks (pond control) |
| Scale | Hot Pepper Wax, Bonide All-Season Spray, Insecticidal Soap, Bonide Eight Predator: Green lacewing |
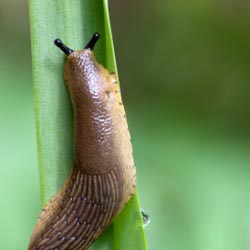
| Slugs | Concern Slug Stop, Monterey Sluggo Predator: Birds |
| Thrips | Captain Jack’s Dead Bug Brew, Insecticidal Soap, Bonide All-Season Spray, Pyrethrin, Hot Pepper Wax, Garlic Barrier, Neem Oil |
| Whiteflies | Insecticidal Soap, Pyrethrin, Repel M Sticky Tape, Safers or Tanglefoot Sticky Whitefly Trap, Bonide Eight, Garlic Barrier Predators: lady bugs, encarsia formosa or lace wings |